

Build a LAN File Sharing System: Day 1 - Upload files with QR code
Moving files between your phone and laptop in 2026 is still miserable. This week you build the fix in 300 lines.

Cross-device file transfer in 2026 is still miserable. AirDrop works but only if everyone is on Apple. Emailing yourself hits a 25 MB attachment cap and destroys quality. WhatsApp compresses your 4K videos into potato quality. Google Drive means uploading to a corporation, then downloading from that corporation, for a file that never needed to leave your house. Snapdrop is buggy, LocalSend requires an app installed on every device, and PC-to-phone transfer is universally awful.
This week we build the fix. Three hundred lines of Python that turns your laptop into an AirDrop-for-everyone server. Your phone, your friend’s Android, your kid’s iPad, a Windows machine, another laptop — anything with a browser on the same WiFi can send files to you. No accounts, no cloud, no apps to install anywhere except your laptop. You start the server, it prints a QR code, everyone scans it, everyone drops files, done.
Day 1 is the upload half — anyone on your WiFi can send files to your laptop. Day 2 adds the download half, drag-and-drop, PIN protection, and a file browser so it’s a two-way tool. Both days build on the same core insight: a laptop running a small web server on the LAN is a better peer-to-peer file transfer solution than anything in the app store, and modern Python makes it a weekend project.
Projects in this week’s series:
👉 Day 1 (Today): Upload server with QR code
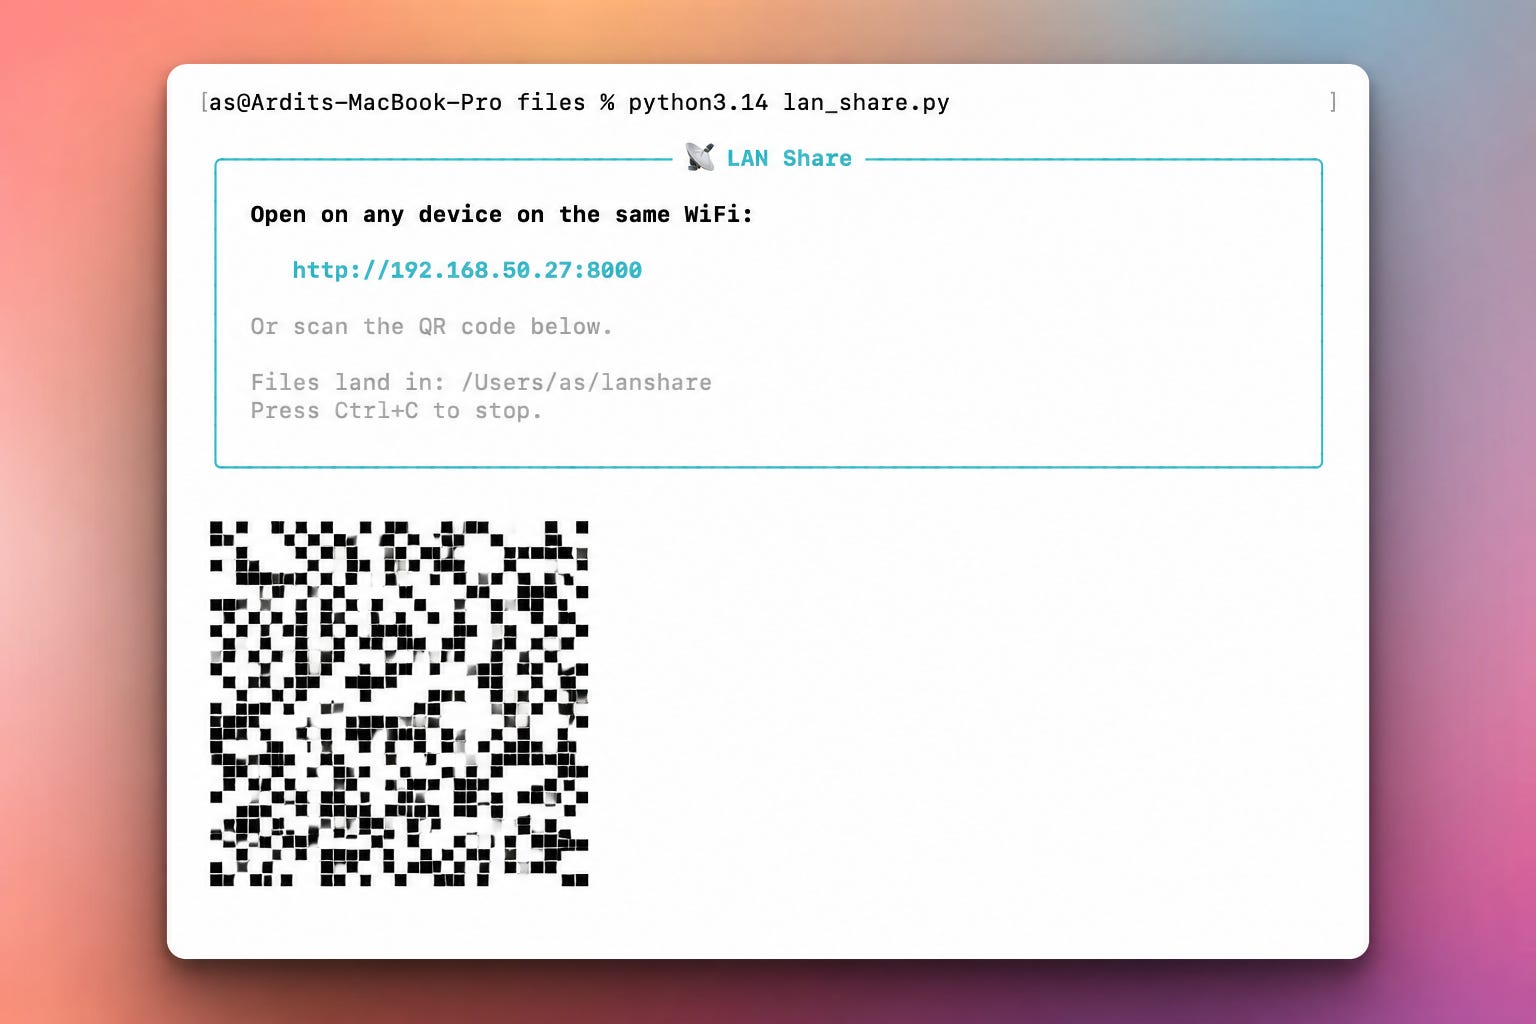
When you run the script, the terminal prints a colored panel with the URL and a QR code your phone camera can scan directly. It also tells you exactly where uploaded files will land and starts logging every upload live:
Your phone opens the URL and sees a simple mobile-first upload page. Tap the file picker, choose photos from your library or take one with the camera, hit Upload, done. The page shows a green success banner after every upload:
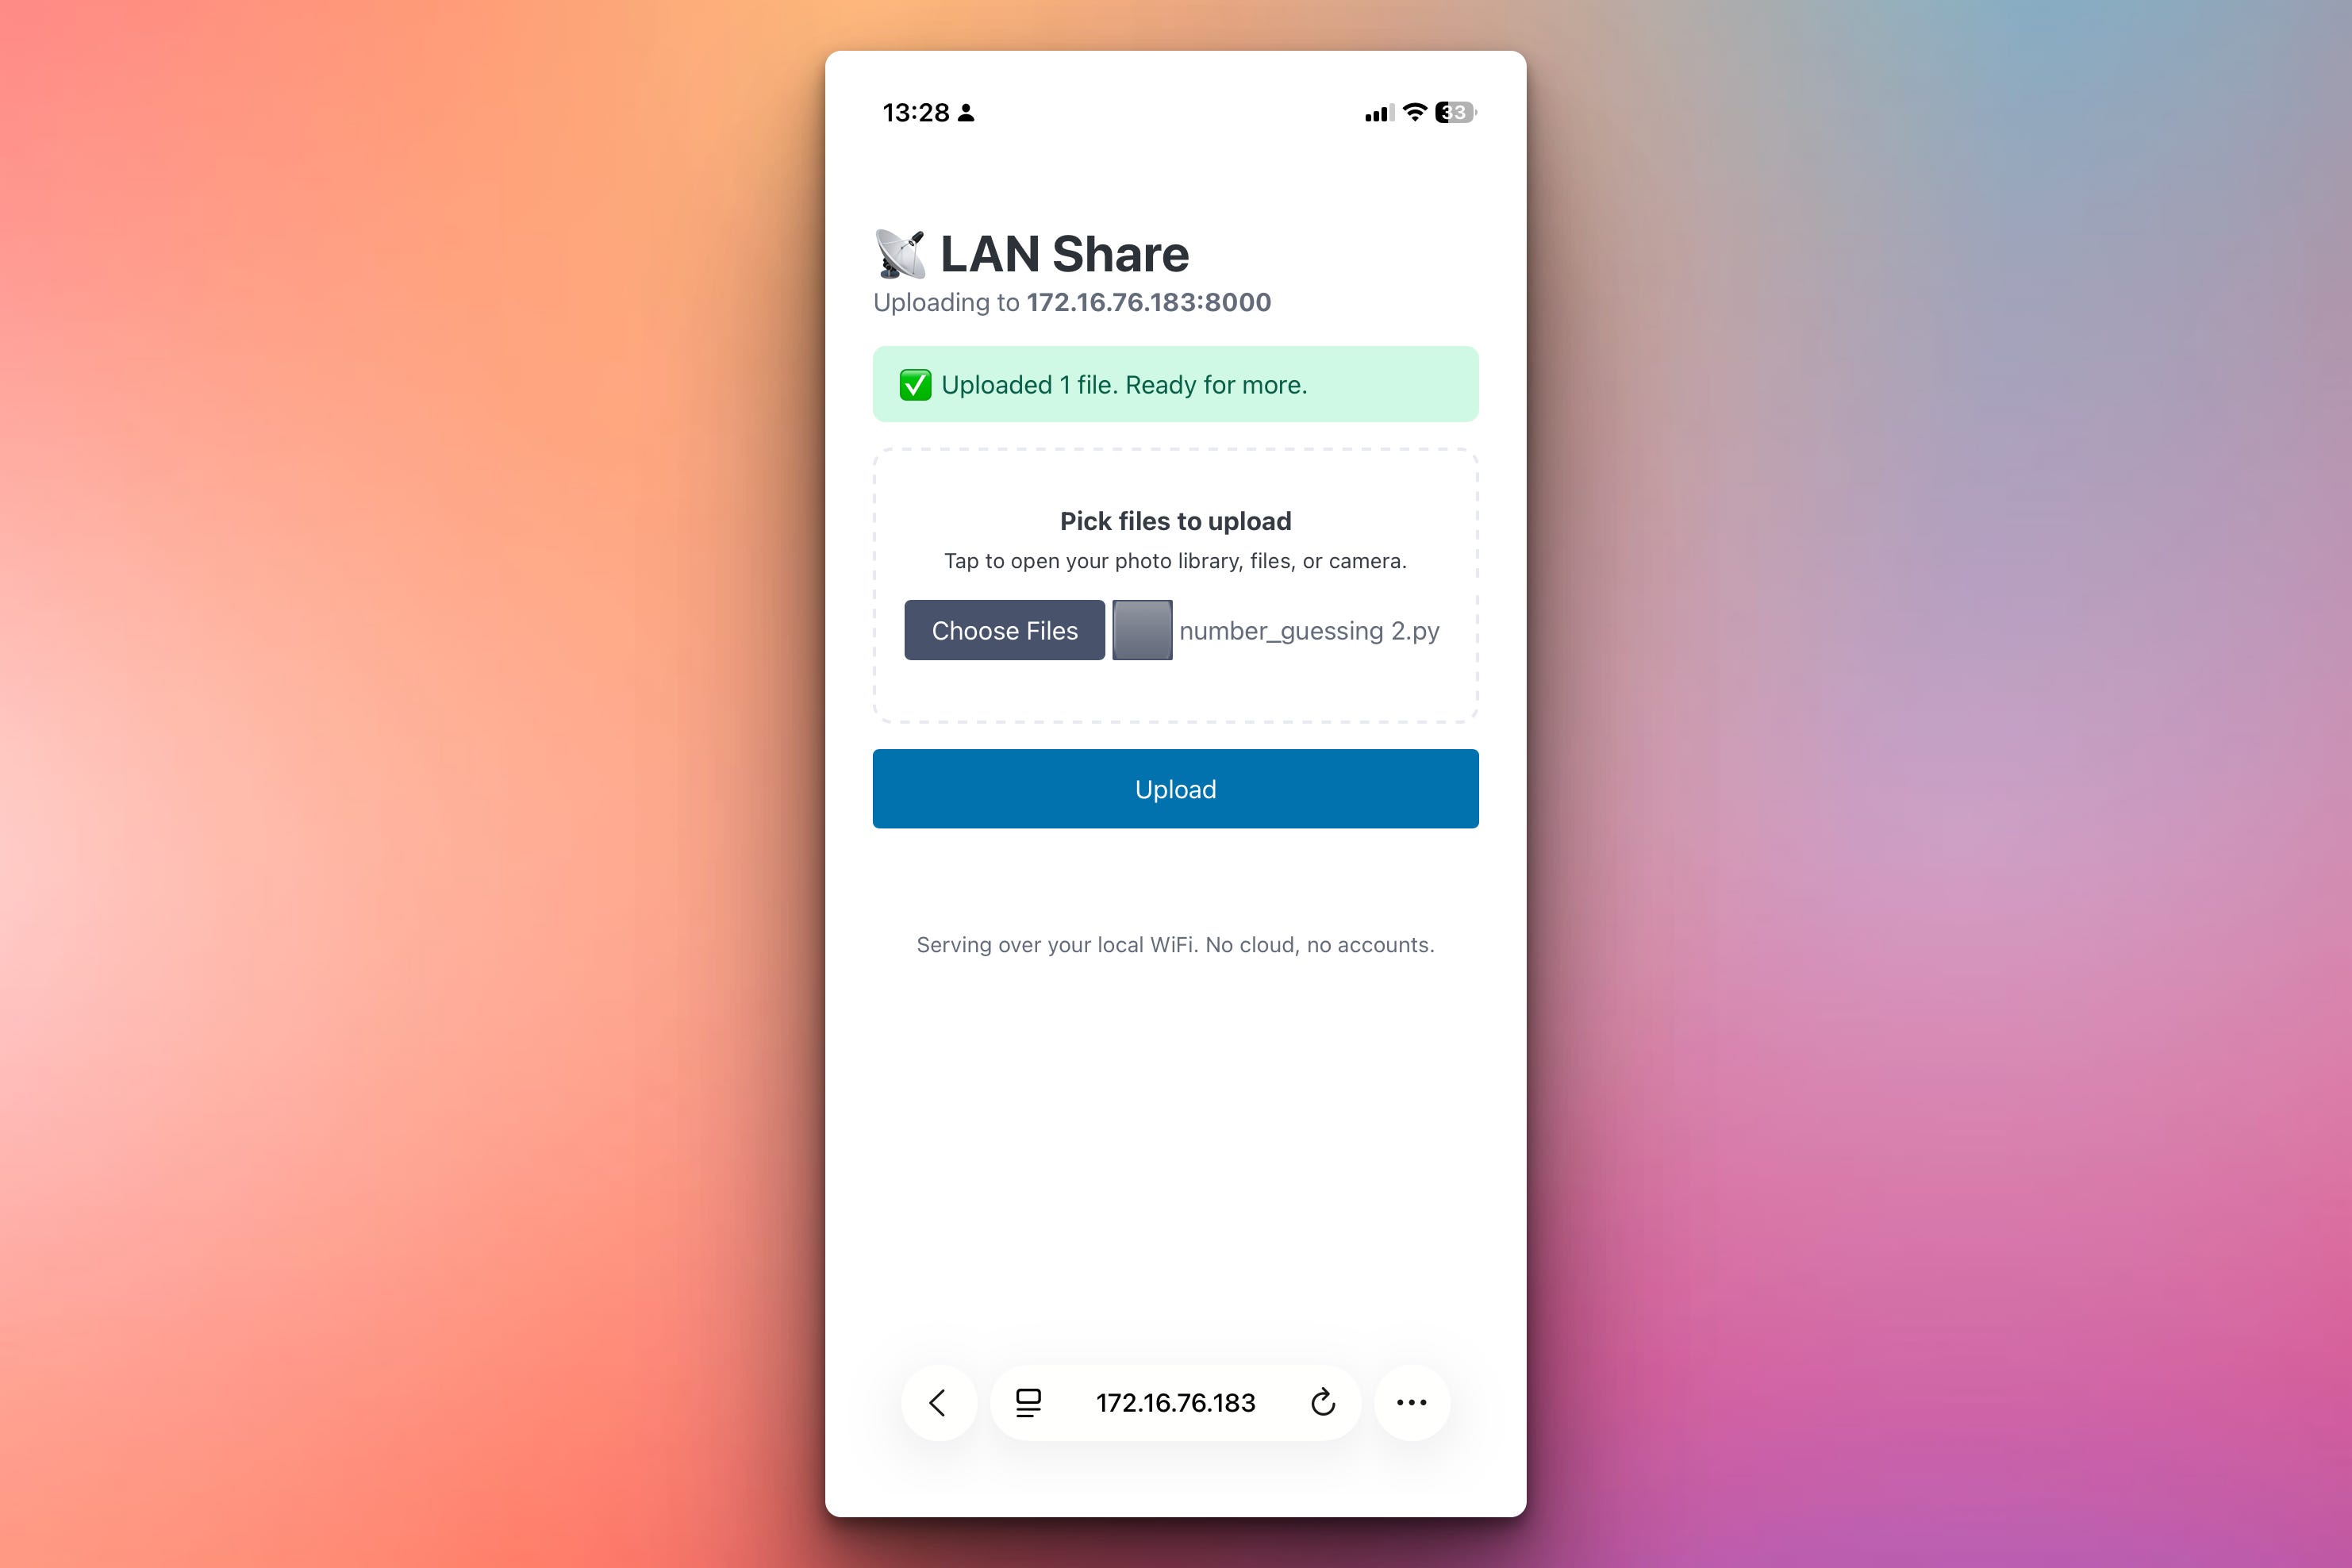
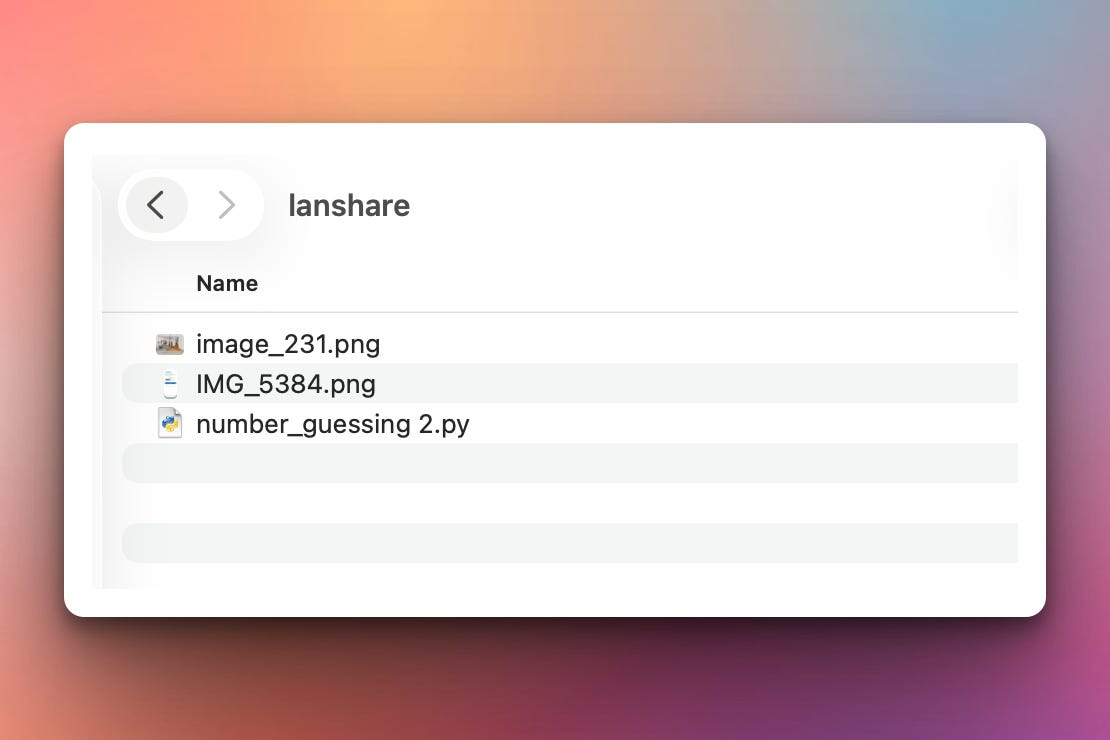
I did use the actual app that I built to transfer the screenshot above to my computer and upload it in this post. Here is how my “lanshare” folder looks like in my computer after uploading some files from my phone:
Path traversal attacks are blocked, filename collisions auto-rename (photo.jpg becomes photo (1).jpg), and uploads stream to disk in chunks so a 4 GB video doesn’t blow up your laptop’s memory.
Day 2 (Tomorrow): Downloads, drag-and-drop, and PIN protection
Same server, but bidirectional and prettier. Drag files onto the browser window instead of using the picker. Real progress bars during upload so you know your video isn’t stuck. A file gallery on the page showing everything that’s been uploaded so far, with a Download button next to each — so your friend can grab files back off your laptop instead of only sending them:
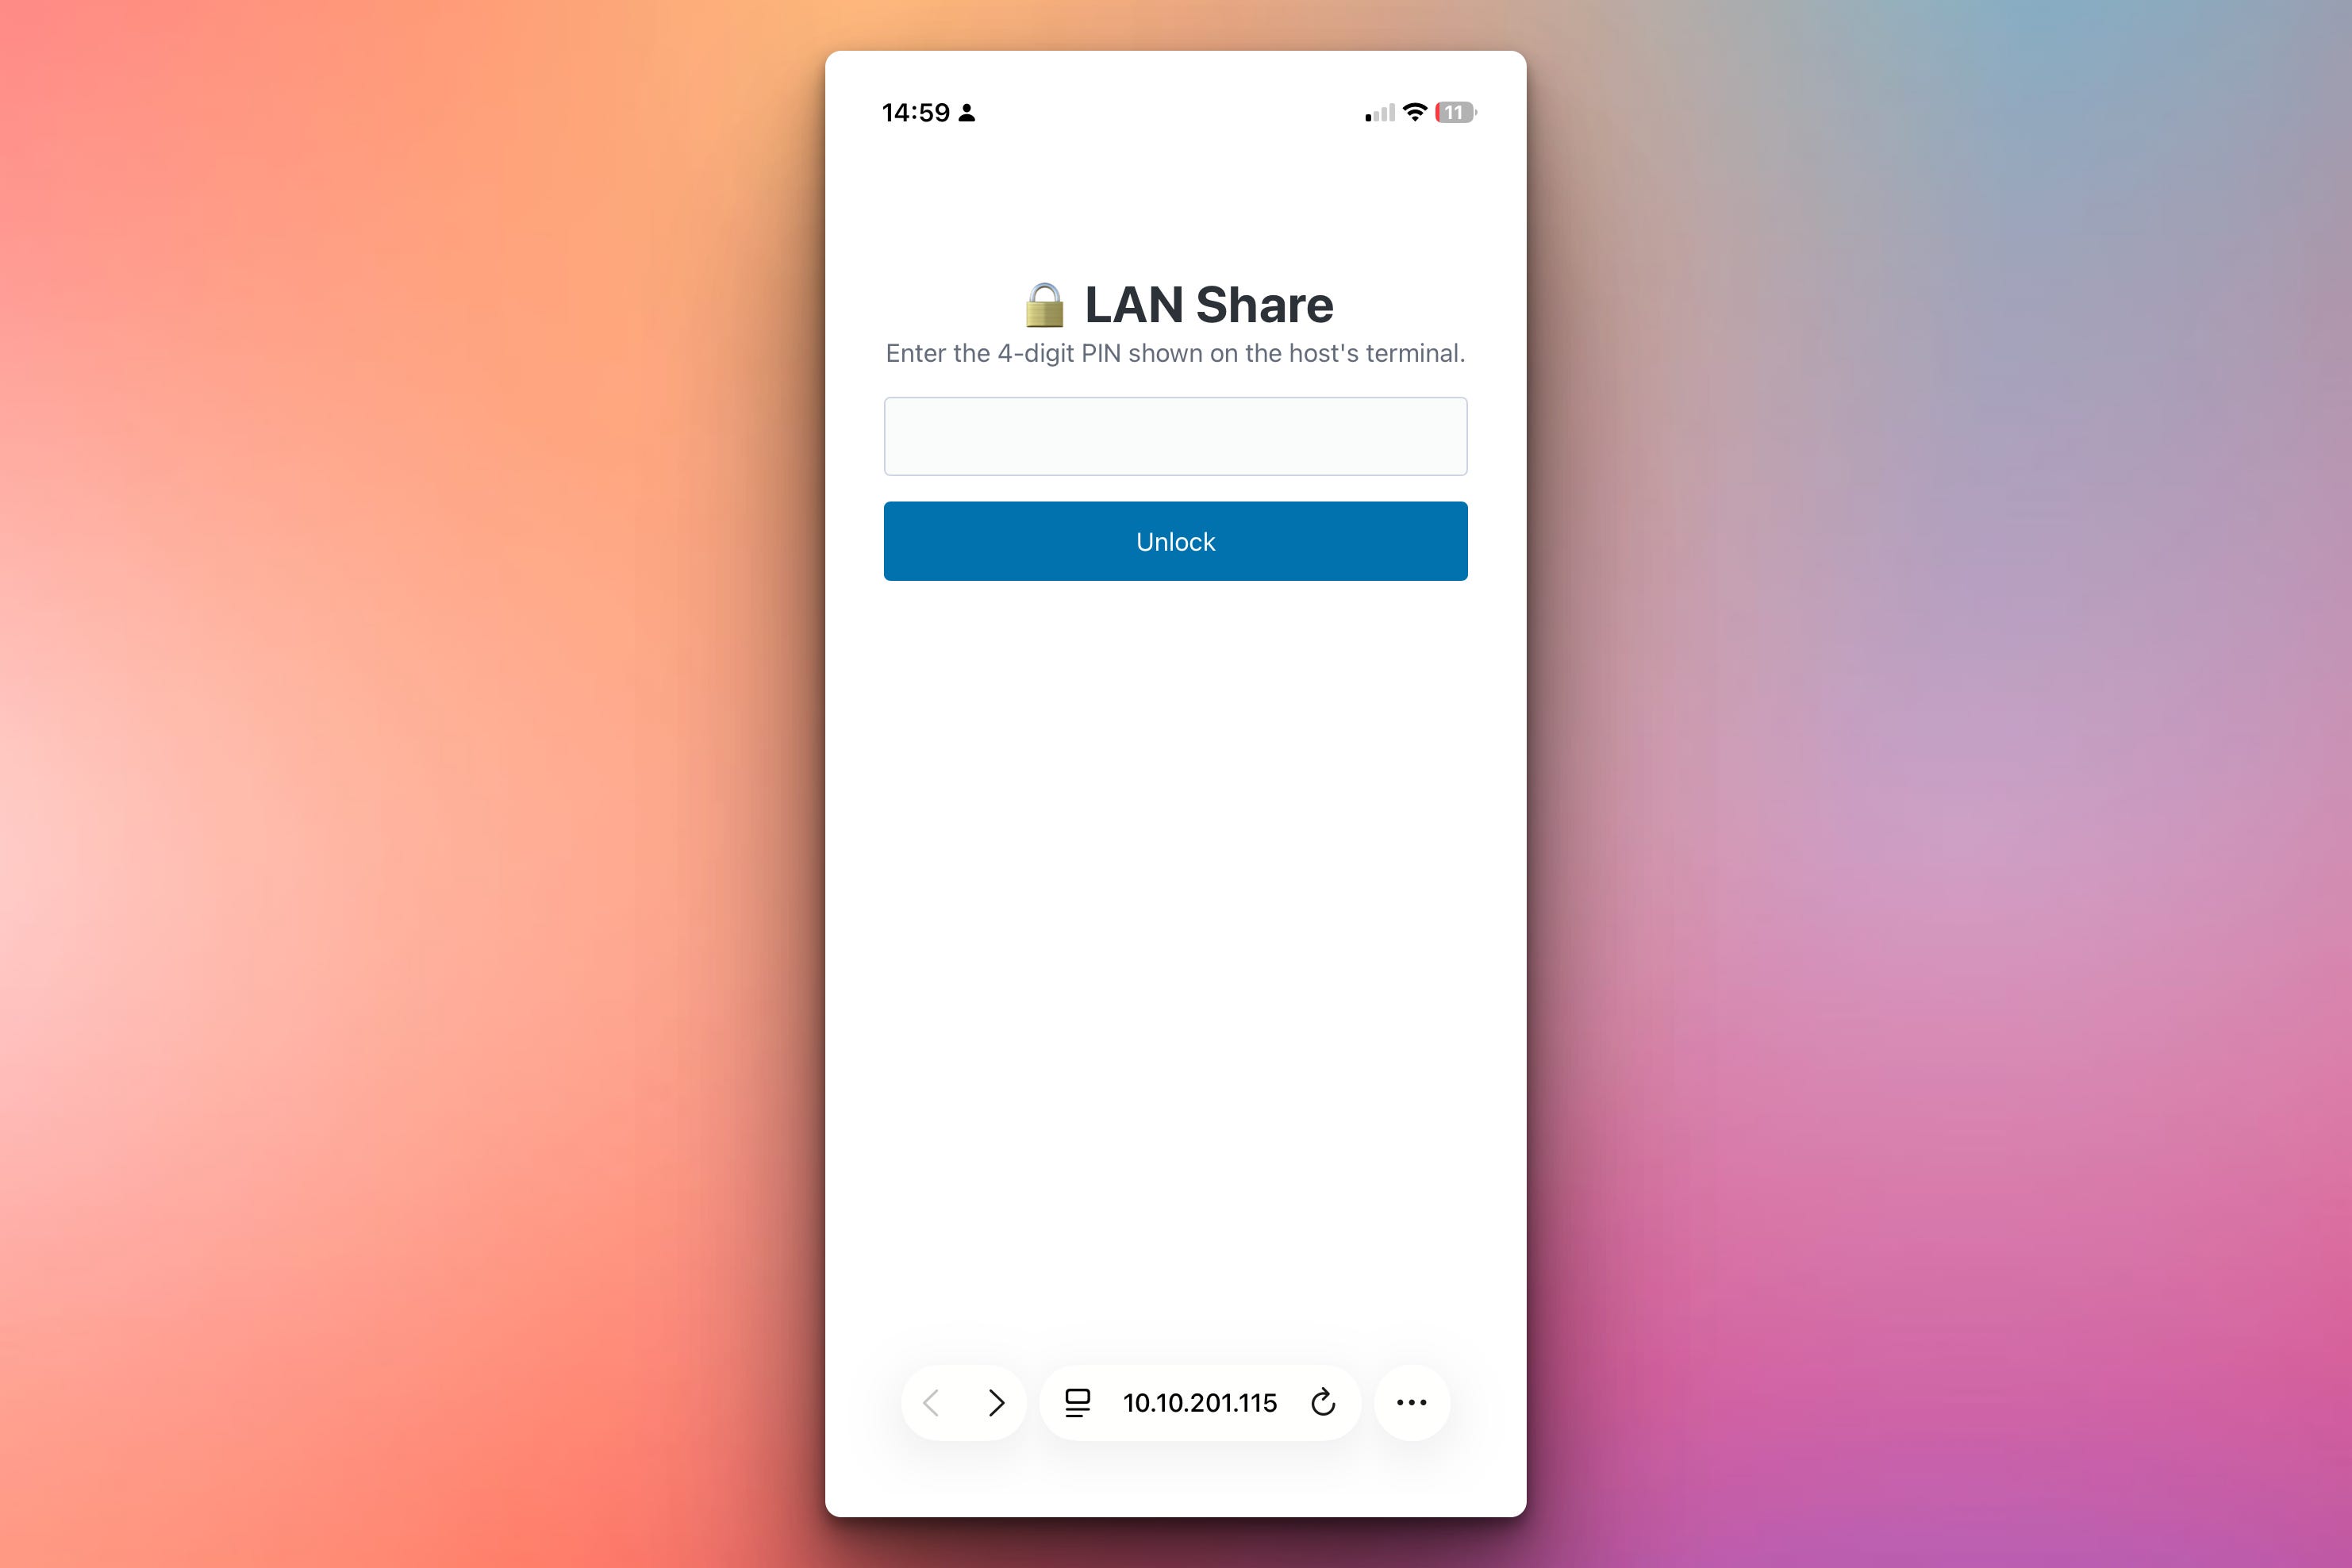
Plus a 4-digit PIN shown in the terminal on startup that anyone visiting the page has to enter first. That way if your neighbor is on the same coffee shop WiFi, they can’t just find your server and upload themselves 200 GB of memes.
About the stack
Four small packages and one CDN link, no JavaScript files, no accounts, no cloud.
FastAPI is the web framework, same one we used for the Notes app in Week 28. It handles multipart file uploads out of the box, streams big files through UploadFile.read(chunk_size), and gives us clean async routes.
uvicorn is the ASGI server that actually runs FastAPI. It binds to 0.0.0.0 so any device on the local network can reach it, and its default settings handle huge file uploads without any tuning.
python-multipart is a dependency FastAPI needs for parsing HTML form uploads. It’s the difference between “your server sees the multipart data” and “your server sees nothing.” Install it, then forget about it.
qrcode generates QR codes. Not a huge library, and importantly it can render straight to the terminal using Unicode half-block characters — a real, scannable QR code that fits in 33 characters of terminal width. No image file, no screen sharing, just Unicode in your terminal.
Rich styles the terminal output — the startup panel, the colored upload log. Not strictly necessary but the polish makes the tool feel like a real product rather than a script.
Pico.css from a CDN gives us a mobile-first, classless styling framework. We write plain semantic HTML like <form>, <input type="file">, <button>, and it looks like a real product on both desktop and mobile. Zero CSS files in our project.
Setup Instructions
Install dependencies:
pip install fastapi uvicorn python-multipart qrcode rich
Five packages. All small, all mature, none likely to break in the next five years.
Run it:
python lanshare.py                       # save uploads to ~/lanshare/
python lanshare.py ~/Downloads           # save to your Downloads folder
python lanshare.py ~/photos --port 9000  # custom folder and port
The default target folder is ~/lanshare/, auto-created on first run. The default port is 8000. Once running, the terminal prints the URL to open on any device on the same WiFi and a QR code you can scan directly.
Firewall note: on macOS, the first time you run this you’ll get a popup asking whether to allow incoming connections. Click Allow. On Windows, Windows Defender Firewall will ask the same thing. On Linux you’re on your own.
Understanding LAN IP Discovery
The single most useful trick in this entire project is finding your own LAN IP so you can print it. Sounds easy — you have an IP, right? — but it’s actually one of the classic gotchas of network programming.
The obvious way, socket.gethostbyname(socket.gethostname()), doesn’t work reliably. On many machines it returns 127.0.0.1 (localhost), which is useless for LAN sharing. On some machines it returns an IP from a virtual network interface (Docker, VMware, VirtualBox) that no other real device can reach. On multi-homed machines with multiple network interfaces, it might return the wrong one entirely.
The elegant trick that actually works is this:
def get_lan_ip():
    s = socket.socket(socket.AF_INET, socket.SOCK_DGRAM)
    try:
        s.connect(("8.8.8.8", 80))
        return s.getsockname()[0]
    finally:
        s.close()
We open a UDP socket and “connect” it to Google’s public DNS server (8.8.8.8). But UDP is connectionless — no actual network traffic happens here. What happens is the operating system’s kernel picks the network interface that would be used if we were to send a packet to 8.8.8.8, and the socket now has that interface’s IP bound to it. We read that back with getsockname(), close the socket, and we’re done.
This works because the kernel’s routing table is the ground truth for “what IP would other devices see if I sent them a packet.” Whether you’re on WiFi, Ethernet, or a hotspot from your phone, the kernel knows which interface has internet access and returns its IP. It works on macOS, Linux, and Windows without changes. And crucially, it ignores virtual network adapters like Docker’s docker0 which would otherwise confuse things.
The 8.8.8.8 address is arbitrary — any routable public IP works. We use Google’s DNS because it’s globally famous and unlikely to disappear, but 1.1.1.1 or literally any public IP would work equally well.
Understanding FastAPI File Uploads
FastAPI handles file uploads through the UploadFile type, which is a Starlette wrapper around a SpooledTemporaryFile. The magic is that FastAPI never loads the whole file into memory unless you make it. You get to control the streaming yourself:
from fastapi import FastAPI, File, UploadFile
from typing import List

@app.post("/upload")
async def upload(files: List[UploadFile] = File(...)):
    for f in files:
        size = 0
        with open(target_path, "wb") as out:
            while True:
                chunk = await f.read(1024 * 1024)   # 1 MB at a time
                if not chunk:
                    break
                out.write(chunk)
                size += len(chunk)
The critical part is that await f.read(1024 * 1024) reads at most 1 MB of the upload at a time. We write it to disk immediately, then loop back for the next chunk. Total memory used: about 1 MB per file being uploaded, no matter how big the file is. A 4 GB video and a 4 KB text file both use the same amount of RAM.
Contrast this with the naive contents = await f.read() which reads the entire file into a single bytes object. Send a 4 GB video that way and your server tries to allocate 4 GB of RAM. Bad.
The List[UploadFile] type combined with <input type="file" multiple> in the HTML lets users pick multiple files at once and we handle them all in a single request. Each file goes through the same streaming loop.
Understanding Collision Handling
If two people upload files called photo.jpg, only one of them can win — unless we auto-rename on collision. The pattern that every operating system’s file manager uses is foo.jpg, foo (1).jpg, foo (2).jpg, and so on:
def unique_path(folder, name):
    p = folder / name
    if not p.exists():
        return p
    stem, suffix = p.stem, p.suffix
    for i in range(1, 10_000):
        candidate = folder / f"{stem} ({i}){suffix}"
        if not candidate.exists():
            return candidate
    # Fallback if someone somehow has 10k files with the same name
    return folder / f"{stem}-{datetime.now():%Y%m%d-%H%M%S}{suffix}"
pathlib gives us stem (filename without extension) and suffix (extension including the dot) for free. Loop up to some large number, and if we somehow hit 10,000 files with the same base name, fall back to appending a timestamp. That fallback will basically never trigger in practice but it keeps the function total — always returns a valid path.
There’s a subtle race condition here: between checking not candidate.exists() and actually opening the file for writing, another concurrent request could theoretically create that filename first. For a LAN tool with a handful of concurrent uploaders it’s not a real problem, but a truly bulletproof version would use os.open with O_EXCL flag to atomically create-if-not-exists. Overkill for our use case.
Understanding QR Codes in the Terminal
The QR code lives in the terminal, not in a browser or an image file. The qrcode library can do this directly:
qr = qrcode.QRCode(border=1)
qr.add_data(url)
qr.make(fit=True)
qr.print_ascii(invert=True)
print_ascii(invert=True) renders the QR using Unicode half-block characters (▀, ▄, █) which pack two “pixels” of QR data into every character cell. That’s why the whole QR fits in 33 columns instead of 66. invert=True means “light QR on dark background” which reads correctly in modern dark terminals like iTerm, Terminator, or Windows Terminal.
Any modern phone camera app opens QR codes automatically. iPhone Camera, Android Camera, most third-party barcode scanners — they all see the QR, recognize the URL, and offer to open it in the browser with a single tap. The whole “print QR in terminal, phone scans it, browser opens” flow takes about three seconds.
Understanding the Mobile-First HTML
The upload page is one Jinja-free HTML string, styled entirely by Pico.css from a CDN. The whole payload is 1.5 KB and renders identically on desktop browsers and mobile ones:
<form method="post" action="/upload" enctype="multipart/form-data">
  <div class="upload-box">
    <input type="file" name="files" multiple required>
  </div>
  <button type="submit">Upload</button>
</form>
Three tricks worth pointing out:
enctype="multipart/form-data" is required for file uploads. Without it, the browser sends just the filename as a text field and your file goes nowhere. Miss this one attribute and you spend an hour debugging.
multiple on the file input lets users pick multiple files at once. On iPhone, this makes the photo picker allow multi-select. On Android, same thing. On desktop, Cmd/Ctrl-click in the file picker works. One attribute, huge UX win.
No accept attribute means the picker accepts any file type. On iPhone this shows a menu with “Photo Library”, “Take Photo or Video”, and “Choose Files”. On Android, “Camera”, “Files”, and “Photos”. On desktop, the normal file picker. The whole platform-specific file selection UI comes free with <input type="file">.
Practical Use Cases
Airdropping to Windows or Android friends. This solves the “I have an iPhone but my friend/partner/kid has an Android” problem forever. Start the server, share the QR code (screenshot it, or just show them your terminal), and both devices can send files to your laptop.
Getting photos off a phone at a party or event. Instead of everyone AirDropping photos to one person and then that person figuring out how to share them, everyone uploads to one laptop over the venue WiFi. All photos land in a shared folder in real time. Then you sync them to a shared album later.
Team file drops during a workshop or meeting. Running a workshop and want everyone to submit their exercise files? Way faster than a shared Google Drive folder and doesn’t require anyone to have a Google account. Start the server, project the QR code, everyone submits.
Foundation for Day 2. Every function we built today gets reused tomorrow. safe_filename and unique_path become the basis for a file gallery view. The Rich terminal logging pattern gets extended with download events. The Pico.css upload page evolves into a drag-and-drop UI. That’s the pedagogical arc of the week: minimal working thing today, complete production-quality tool tomorrow.
Coming Wednesday
Tomorrow we add the other half — downloads, so your friend can pull files off your laptop instead of only sending them. Drag-and-drop upload with real progress bars during transfer. A file gallery on the page showing everything that’s been uploaded, with a Download button next to each file. And a 4-digit PIN protection layer so your neighbor at the coffee shop can’t upload themselves onto your laptop.
If you want the full tool, upgrade here before Wednesday.
Solution
Below you will find the downloadable solution.py file containing the correct solution.
Get the code here:
This sounds cool. I wonder if I can use it with my NAS. Need to read further....
How can a Subscriber access Day 2 today?