

Email Productivity Suite: Day 1 - Email Sender (Tkinter)
Create a GUI app with Python to send out emails.

Projects in this week’s series:
This week, we build an Email Productivity Suite — a complete set of tools for one of the most universal time-sinks in modern life: writing and sending email. By Friday, you’ll have a desktop app that sends single emails, mail-merges to a CSV list, and uses AI to rewrite rough drafts in any tone you want.
Why build this? Because email isn’t going away — AI made it easier to write but more of it gets sent. Python automation around email is one of those rare skills that pays off in every job, every side project, every freelance gig.
What you’ll learn: This series teaches you Python’s smtplib and email modules, Gmail authentication via app passwords, sending plain and HTML email, attaching files, CSV-driven personalization, and integrating LLMs into a real desktop workflow.
Why this matters: By Day 3, you’ll paste a rough message — “tell my professor I cant make tomorrow’s office hours” — and the AI rewrites it as a polite, professional email, ready to send. That’s the kind of tool you’ll actually use.
Day 1: Email Sender Desktop App (Today)
Day 2: Mail Merge from CSV
Day 3: AI Email Assistant (Gemini)
Today’s Project
We start with the foundation of everything else this week: a desktop app that sends one email. Type the recipient, subject, and body, click Send, and your email goes out via Gmail. By the end you’ll understand how Python actually talks to a mail server — the same code powers everything from cron-job notifications to 100-recipient mail merges.
This is the engine. Days 2 and 3 wrap new features around it.
Project Task
Build a Tkinter desktop email sender that:
Provides input fields for: From (your Gmail), App Password, To, Subject, Body
Sends the email through Gmail’s SMTP server using
smtplibShows clear status: connecting, authenticating, sending, success/failure
Hides the password field with asterisks
Validates input (no empty recipient, no missing password) before sending
Reports detailed error messages when authentication or sending fails
Has a “Clear” button to reset the form
Doesn’t crash on network errors — failures are caught and reported
This project gives you hands-on practice with smtplib, the email.message module, Gmail’s STARTTLS authentication, Tkinter form layout, password fields, multi-line text widgets, and the cleanest pattern for separating GUI from logic in a desktop app.
Expected Output
Running the app:
python email_sender.py
That will open the following app in your computer. Below, I already filled in the sender email address and its app password (see further below on how to get an app password for your Gmail account). I also wrote an email.
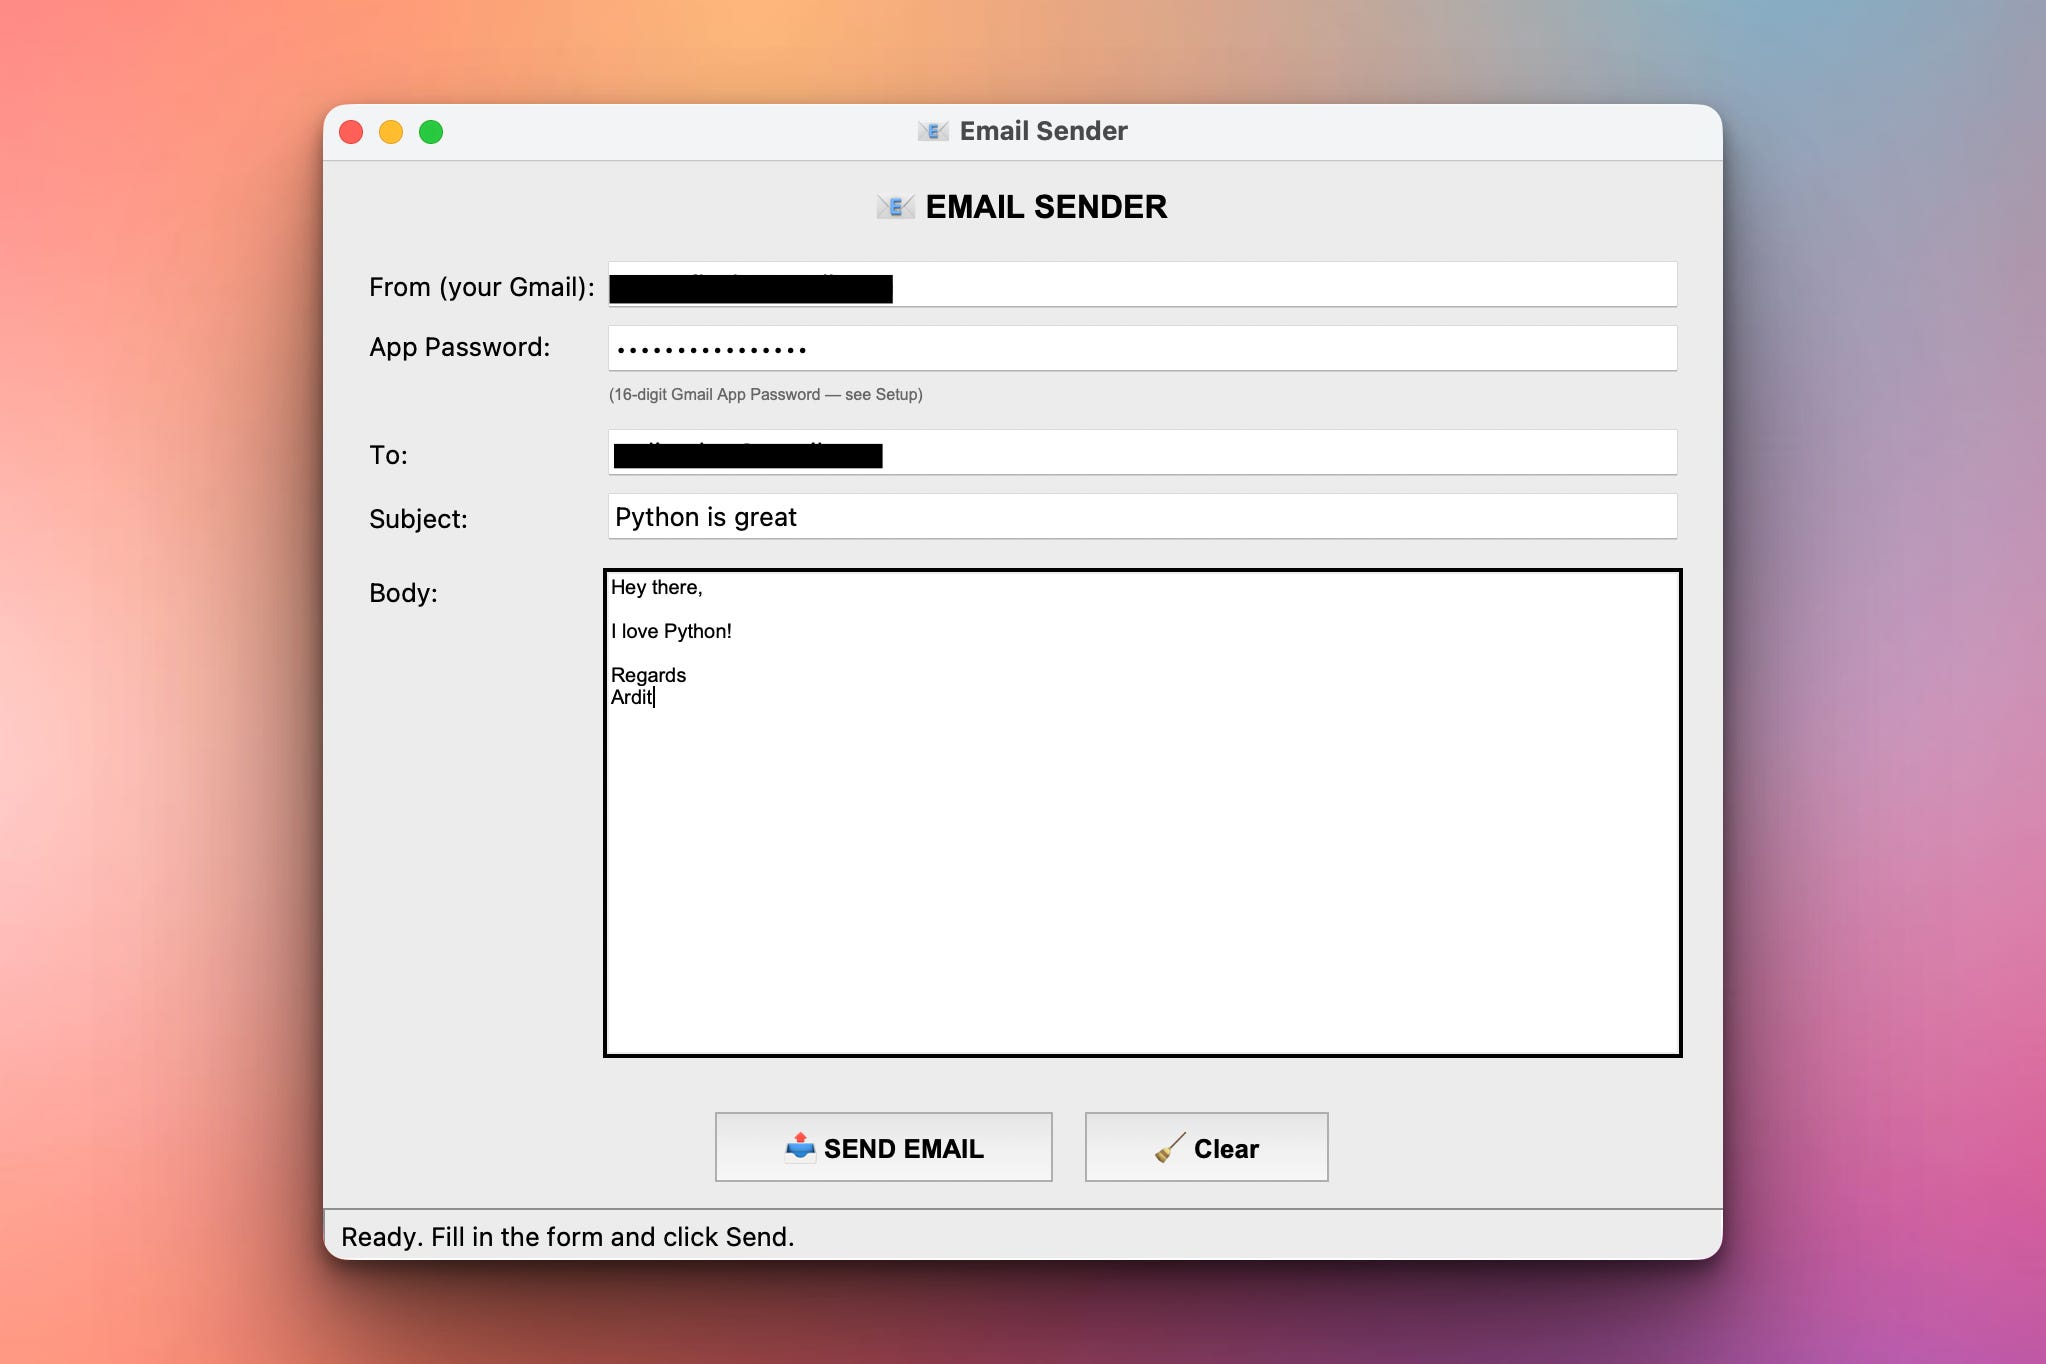
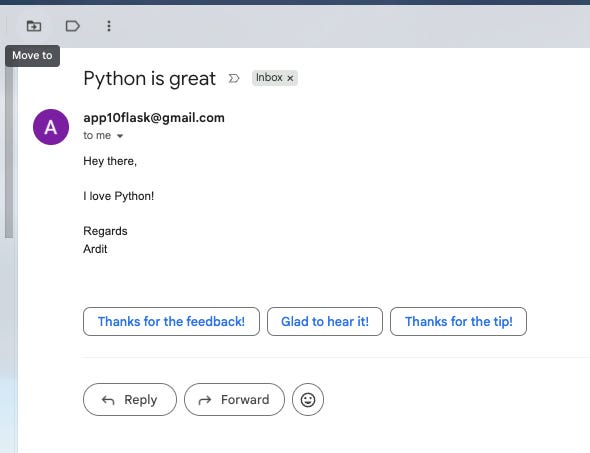
Pressing the SEND EMAIL button will send out the email from the sender’s address to the receiver’s address. Here is what I received in my gmail account:
Setup Instructions
Step 1 — Install (no dependencies):
This entire project uses Python’s standard library — smtplib, email, tkinter. Nothing to install.
python email_sender.py
Step 2 — Create a Gmail App Password (5 minutes):
You can’t use your regular Gmail password anymore — Google requires an App Password for Python scripts since May 2025.
Go to myaccount.google.com and sign in.
Click Security in the left sidebar.
Under “How you sign in to Google,” enable 2-Step Verification if you haven’t already. (App passwords require it.)
Once 2FA is on, go directly to myaccount.google.com/apppasswords.
Type any name (e.g., “Python Email”) and click Create.
Google shows a 16-character password in a yellow box. Copy it.
Paste it into the App Password field in the app — no spaces, just the 16 characters.
Security note: for simplicity, this app keeps the password in the form text field, in memory only. It’s never saved to disk. A more secure setup uses
keyringor environment variables — we’ll mention that briefly on Day 3.
Understanding SMTP and Gmail
SMTP — Simple Mail Transfer Protocol — is the protocol that’s moved email between servers since the 1980s. It’s still the protocol. Your script connects to Gmail’s SMTP server, authenticates, and hands over a message; Gmail does the rest.
Python’s smtplib handles the protocol:
import smtplib

with smtplib.SMTP("smtp.gmail.com", 587) as smtp:
    smtp.starttls()                          # upgrade to encrypted connection
    smtp.login("you@gmail.com", "your_app_password")
    smtp.send_message(msg)
Three terms worth knowing:
smtp.gmail.com— Gmail’s SMTP server address.Port 587 — the standard “submission” port for outgoing mail.
STARTTLS — starts the connection in plain text, then upgrades to TLS encryption. Required by Gmail.
There’s also a port 465 variant using SMTP_SSL (encrypted from the start). Both work for Gmail; we use 587/STARTTLS because it’s the most common pattern in production code.
Understanding the email.message Module
smtplib sends bytes. To build a proper email — with a Subject, From, To, and a body — we use email.message.EmailMessage:
from email.message import EmailMessage

msg = EmailMessage()
msg["From"] = "you@gmail.com"
msg["To"] = "recipient@example.com"
msg["Subject"] = "Hello"
msg.set_content("This is the email body.")
EmailMessage is the modern (Python 3.6+) way to construct emails. It handles headers, encoding, MIME types, and attachments cleanly. The older MIMEText / MIMEMultipart classes still work but feel clunky compared to this one.
Setting headers is dictionary-style (msg["Subject"] = ...); setting the body is method-style (msg.set_content(...)). That’s just a quirk of the API — once you know it, the rest is straightforward.
Understanding the Pure Send Function
We keep the email-sending logic in a pure function — no Tkinter, no GUI. It takes the fields, sends the email, and either returns or raises an exception. This makes it reusable for Days 2 and 3 and easy to test in isolation:
def send_email(sender, password, recipient, subject, body):
    msg = EmailMessage()
    msg["From"] = sender
    msg["To"] = recipient
    msg["Subject"] = subject
    msg.set_content(body)

    with smtplib.SMTP("smtp.gmail.com", 587) as smtp:
        smtp.starttls()
        smtp.login(sender, password)
        smtp.send_message(msg)
A simple, four-step function. The Tkinter app just calls it. Tomorrow’s mail-merge tool calls it in a loop. Day 3’s AI assistant calls it after the AI is done. One sending function, many surfaces around it.
Understanding Tkinter Form Layout
For a form-style UI, grid() is much cleaner than pack(). You think in rows and columns; labels go in column 0, inputs in column 1:
frame = tk.Frame(root)
frame.pack(padx=10, pady=10, fill=tk.BOTH, expand=True)

tk.Label(frame, text="From:").grid(row=0, column=0, sticky="w")
tk.Entry(frame, textvariable=self.from_var, width=50).grid(row=0, column=1, sticky="ew")

tk.Label(frame, text="To:").grid(row=1, column=0, sticky="w")
tk.Entry(frame, textvariable=self.to_var, width=50).grid(row=1, column=1, sticky="ew")

frame.columnconfigure(1, weight=1)   # input column stretches with the window
Three small details that earn their place:
sticky="w"— labels left-align (”west”) instead of centering on their row.sticky="ew"— inputs stretch horizontally (”east-west”) to fill the column.columnconfigure(1, weight=1)— declares “column 1 gets the extra space when the window resizes.” Without this, the input column never grows.
Understanding Password Fields
Tkinter has a one-line way to hide a password as it’s typed — show="●" on an Entry:
tk.Entry(frame, textvariable=self.password_var, width=50, show="\u2022").grid(...)
\u2022 is the bullet character. ("*" works too; bullets just look cleaner.) The variable still holds the real password — show only affects what the user sees, not what’s stored.
Understanding the Body Text Widget
A single-line Entry won’t work for a multi-line email body — we need a Text widget:
self.body_text = tk.Text(frame, width=50, height=10, wrap="word")
self.body_text.grid(row=4, column=1, sticky="nsew")

# Reading the body later:
body = self.body_text.get("1.0", "end-1c")  # from line 1 char 0 to end, minus the trailing newline
Two Text-widget quirks you’ll see a lot:
get("1.0", "end-1c")— TkinterTextindexes use"line.column"format."1.0"is “line 1, column 0” (the start)."end-1c"is “end minus 1 character” — that strips the trailing newline thatTextalways appends.wrap="word"— wraps lines at word boundaries instead of mid-word.
Understanding Catching SMTP Errors
The send function can fail in many ways: wrong password, bad recipient, network down, Gmail rate-limiting. smtplib raises distinct exceptions for each — we catch them specifically so we can give the user a useful message:
try:
    send_email(sender, password, to_addr, subject, body)
    self.set_status(f"\u2713 Email sent to {to_addr}")

except smtplib.SMTPAuthenticationError:
    self.set_status("\u2717 Authentication failed: check your "
                    "Gmail address and App Password.")

except smtplib.SMTPRecipientsRefused as e:
    self.set_status(f"\u2717 Recipient refused: {e}")

except smtplib.SMTPException as e:
    self.set_status(f"\u2717 Send failed: {e}")

except Exception as e:
    self.set_status(f"\u2717 Error: {e}")
Specific exceptions on top, generic exceptions on the bottom — the classic exception-handling pattern. SMTPAuthenticationError in particular is the one your users will hit most often, almost always because they pasted the App Password with spaces in it. A clear message saves them a lot of confusion.
Understanding Validation Before Send
The send button should refuse to fire when the form is incomplete. A small validation function returns the first error or None:
def validate(self):
    if not self.from_var.get().strip():    return "Please enter your Gmail address."
    if not self.password_var.get():        return "Please enter your App Password."
    if not self.to_var.get().strip():      return "Please enter a recipient."
    if not self.subject_var.get().strip(): return "Please enter a subject."
    body = self.body_text.get("1.0", "end-1c").strip()
    if not body:                           return "Please enter a message body."
    return None
Then in the send handler:
error = self.validate()
if error:
    self.set_status(f"\u2717 {error}")
    return
This is much better than letting the SMTP call fail with a cryptic error. The user sees the actual problem in plain English, before the script even tries to connect.
Understanding the Status Bar
A status bar at the bottom of the window gives the user feedback as the script runs. Three lines do it:
self.status_var = tk.StringVar(value="Ready. Fill in the form and click Send.")
tk.Label(self.root, textvariable=self.status_var, anchor="w",
         bd=1, relief="sunken", padx=8, pady=4).pack(fill="x", side="bottom")
And inside the send method, we update it at each step:
self.set_status("Connecting to smtp.gmail.com...")
self.root.update_idletasks()   # force the GUI to repaint NOW

self.set_status("Authenticating...")
self.root.update_idletasks()

# ... send ...

self.set_status(f"\u2713 Email sent to {to_addr}")
self.root.update_idletasks() is the magic ingredient. Without it, Tkinter batches GUI updates and the user sees nothing happen until the whole send_email call finishes. Calling update_idletasks() forces an immediate repaint — so the user sees “Connecting...” then “Authenticating...” then “Sending...” in real time, instead of a frozen window followed by “Done.”
Coming Tomorrow
Tomorrow we go from one email to many. The Mail Merge tool loads a CSV of recipients, lets you write the email once with placeholder variables like {first_name} and {course}, and personalizes one email per row — sending each with a polite delay between them. Same send_email() function, just a loop around it.
Skeleton and Solution
Below you will find both a downloadable skeleton.py file to help you code the project with comment guides and the downloadable solution.py file containing the correct solution.
Get the code skeleton here:
Get the code solution here:
Great!!!!