

Image Toolkit App with Pillow: Day 3 - Meme Generator & Collage Maker
Today we build two image tools in a single app: a meme generator with the classic top+bottom Impact-font caption (white text, thick black outline) and a collage maker that arranges several photos.

Projects in this week’s series:
This week, we build an Image Toolkit with Pillow that lets you edit photos in a desktop app, watermark whole folders of images at once, and turn photos into shareable memes and collages.
Day 1: Photo Filters Studio (Tkinter)
Day 2: Batch Watermarker
Day 3: Meme Generator & Collage Maker (Today)
Today’s Project
Welcome to the finale — and the fun one. Today we build two image tools in a single app: a meme generator with the classic top+bottom Impact-font caption (white text, thick black outline) and a collage maker that arranges several photos into a single grid image.
Both are real, shareable image tools — output you’d actually post somewhere. And they reuse every Pillow skill from Days 1 and 2: image opening, text drawing, RGBA, positioning, batch handling. The lesson lands: the same fundamentals power every image tool you’ll ever build.
Project Task
Build a two-mode image studio with Tkinter and Pillow that:
Meme Mode:
Loads an image
Lets the user type top and bottom caption text
Draws captions in the classic meme style (uppercase, white with black outline)
Auto-fits the text to the image width (no clipping)
Live preview as text changes
Saves the finished meme
Collage Mode:
Loads multiple images
Lays them out in a configurable grid (2×2, 3×2, 3×3)
Resizes each image consistently
Adds a configurable colored border between images
Saves the finished collage
This project gives you hands-on practice with text styling and stroke outlines, dynamic font sizing, grid layout math, the Image.paste compositing pattern, mode tabs in Tkinter, and reusing one image pipeline across two visual products.
Expected Output
Running the studio:
python meme_collage.py
Meme Mode:
The user can write two pieces of text in the GUI on the right side and the image will be updated instantly:
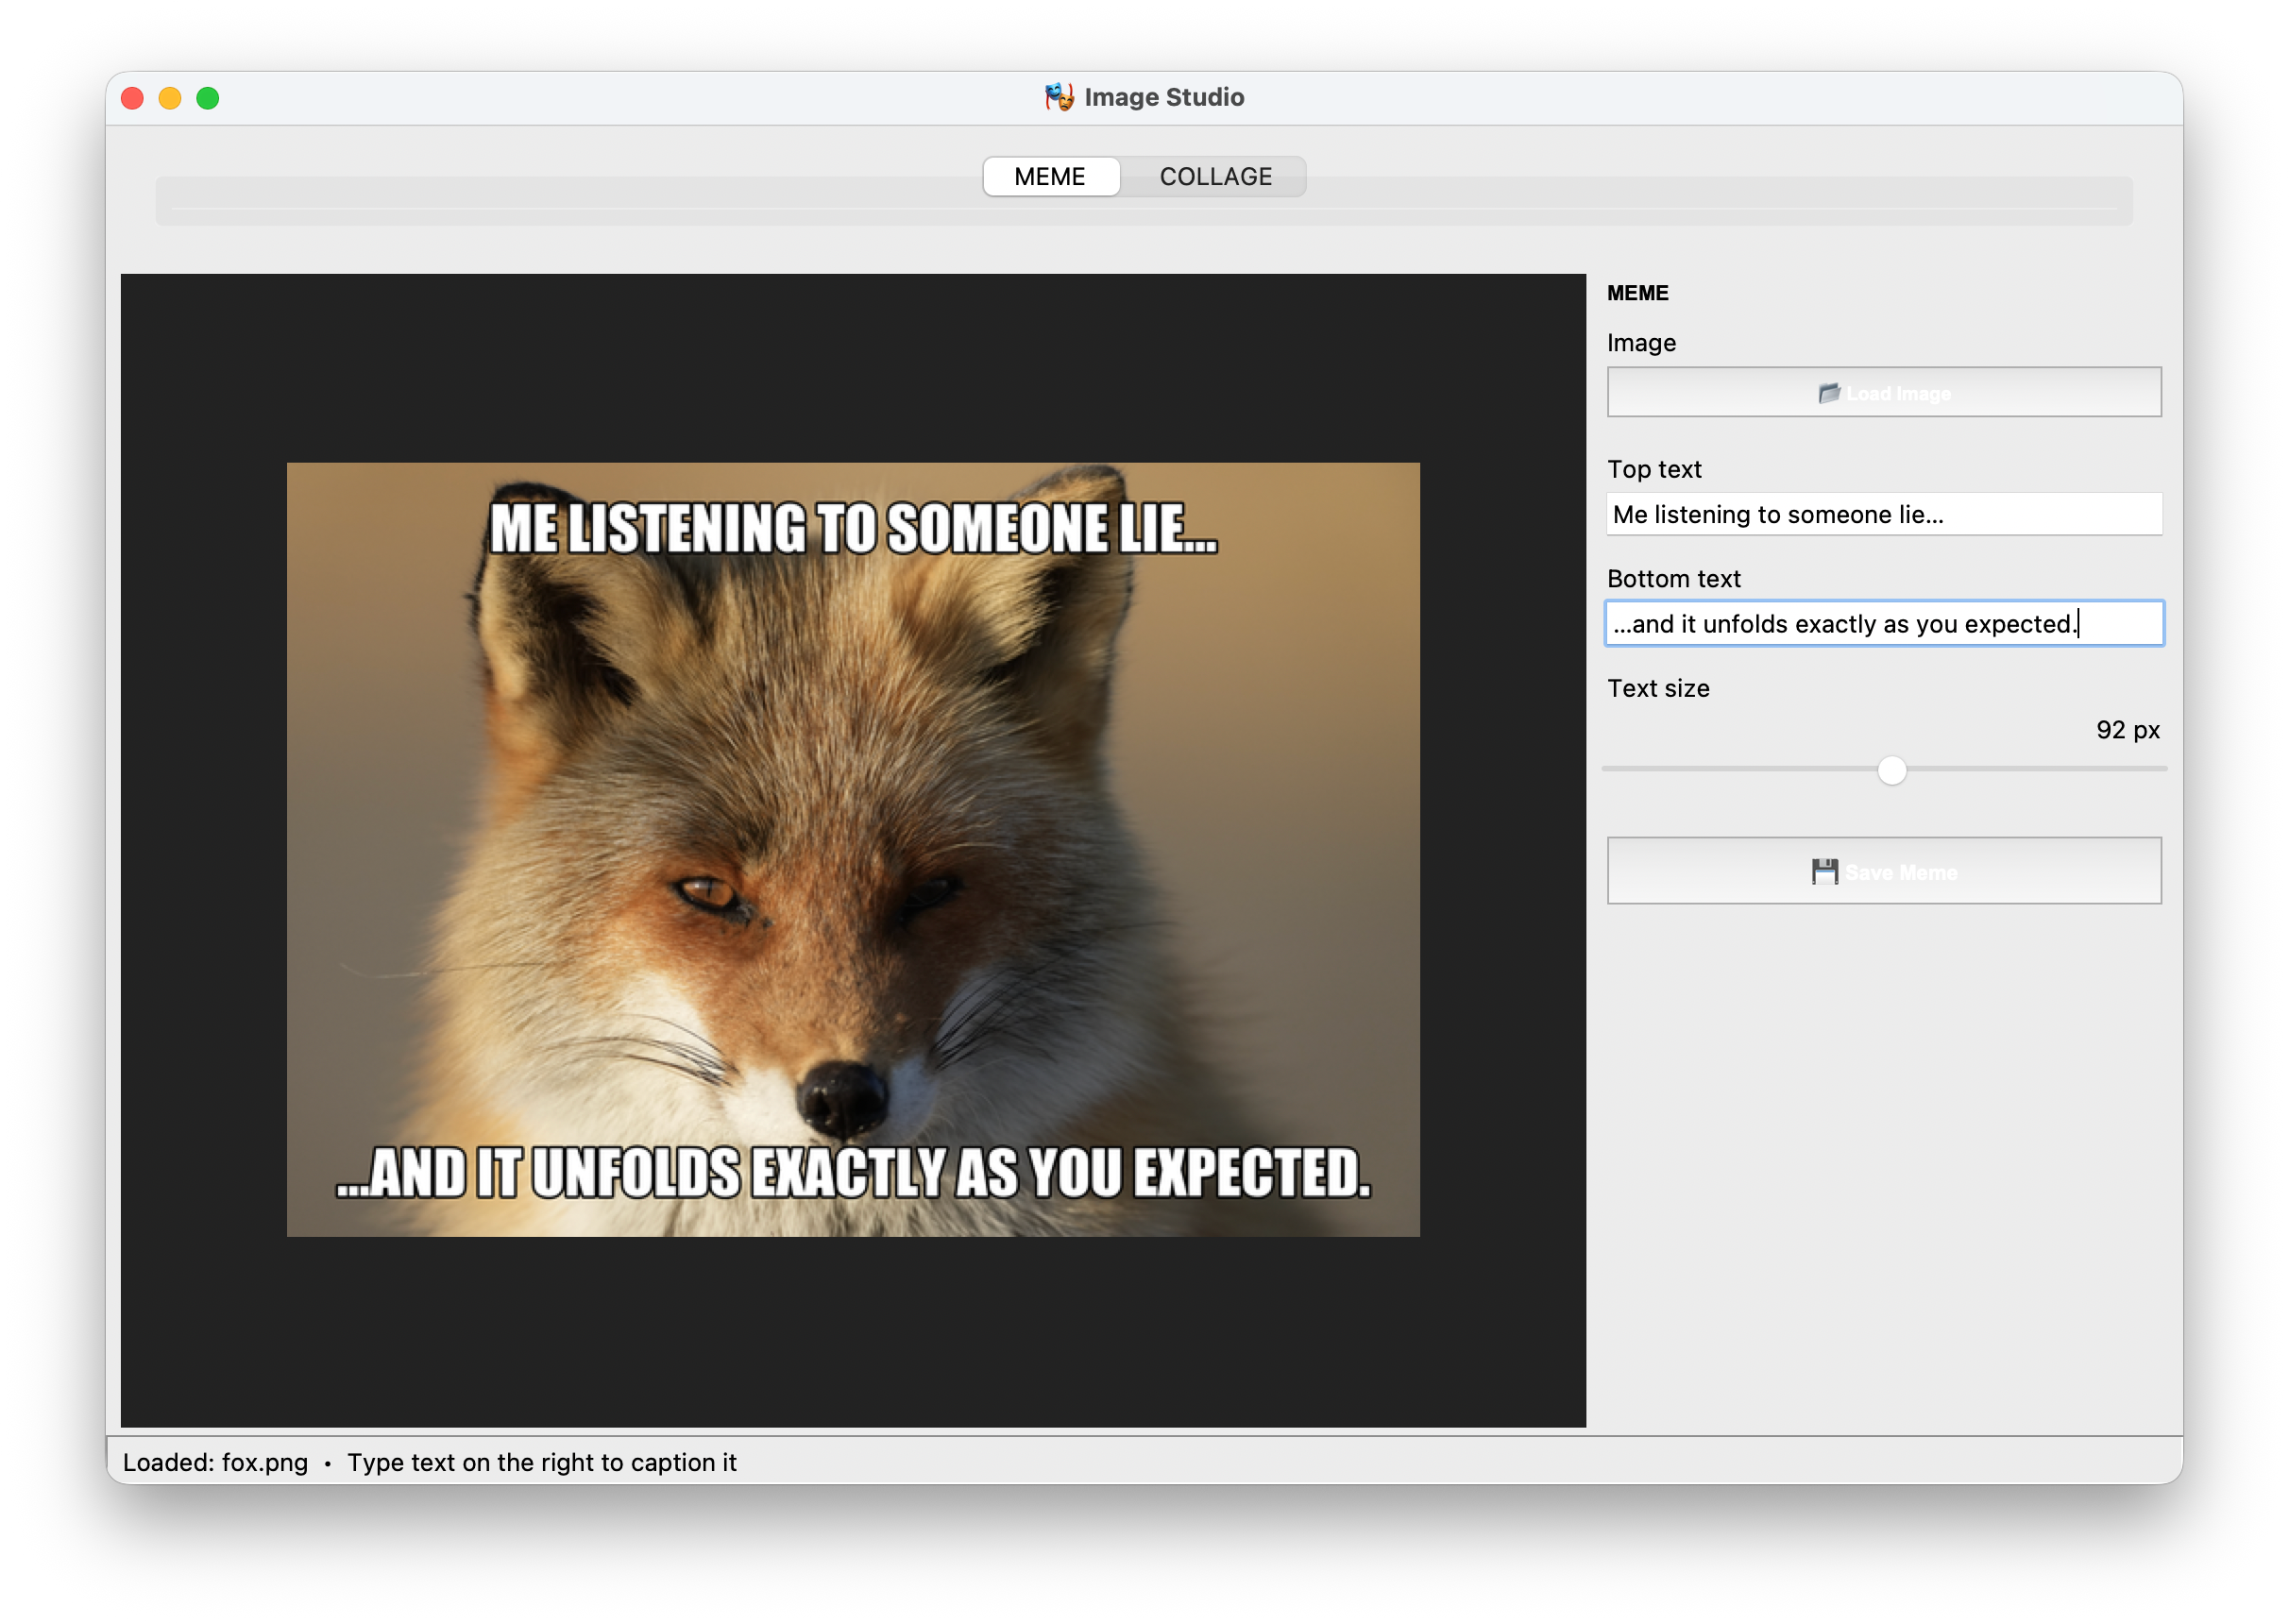
Collage Mode:
In collage mode, the user can select multiple images in their computer and then user the configuration settings on the right to create a collage view of those images:
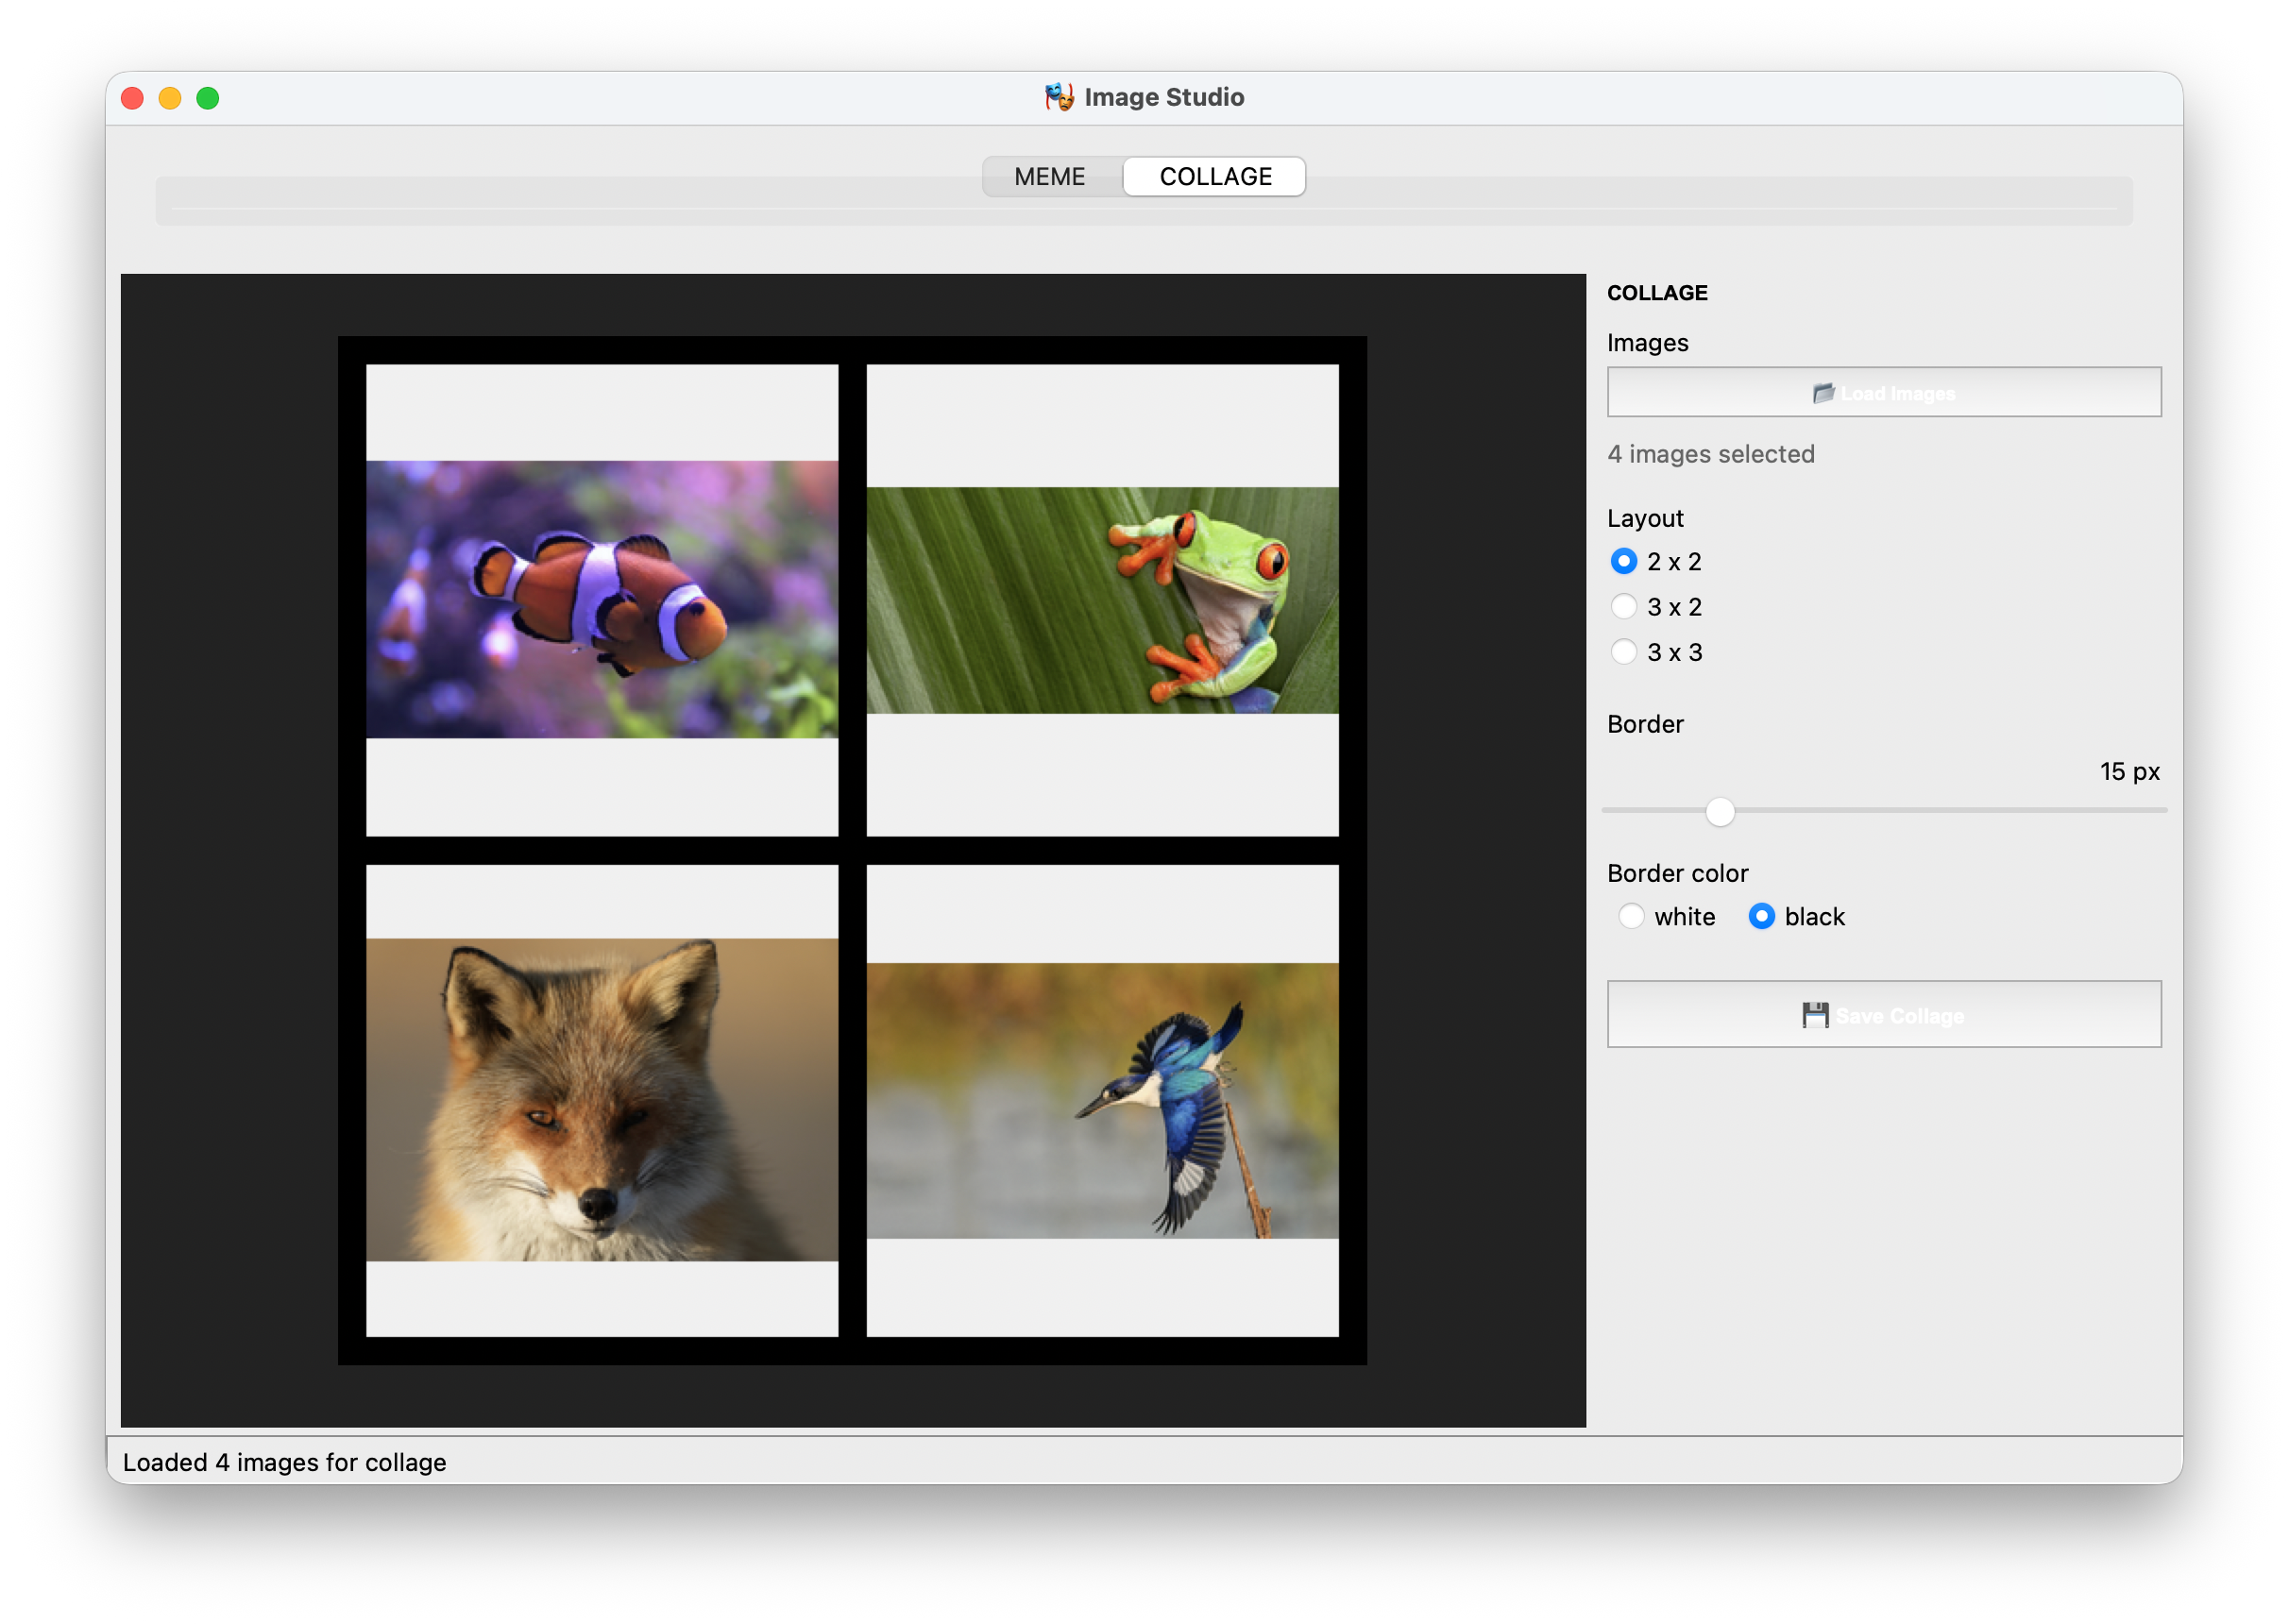
Each mode is its own clean tool, sharing a preview area and Save workflow.
Setup Instructions
Install Pillow:
pip install Pillow
(One dependency, same as Days 1 and 2.)
Run it:
python meme_collage.py
For meme mode, use any image (the sample.jpg from Day 1 works great). For collage mode, you’ll want 2–9 images — drop a few photos into a folder and load them.
Understanding the Two-Mode Architecture
The app is structured around tabs: meme mode and collage mode each get their own controls and their own logic, but share the same preview area, save workflow, and font-loading helper.
class ImageStudio:
    def __init__(self, root):
        # shared state lives on self
        self.preview_image = None
        self.tk_image = None
        # ...

        self.notebook = ttk.Notebook(root)
        self.meme_tab = MemeTab(self.notebook, self)
        self.collage_tab = CollageTab(self.notebook, self)
        self.notebook.add(self.meme_tab.frame, text="Meme")
        self.notebook.add(self.collage_tab.frame, text="Collage")
Two small structural choices that matter:
Each tab gets its own class. Meme and collage are different enough that mixing their state on one giant class gets ugly. Splitting them keeps each tool readable.
The shared parent (
self) holds the preview machinery. Both tabs callparent.set_preview(image)to update the central preview — that way the GUI bit lives in one place.
ttk.Notebook is the standard Tkinter tabbed-pane widget. Switch between Meme and Collage with a click; each tab carries its own state without stomping on the other.
Understanding the Meme Style
The classic meme look has three rules:
Bold sans-serif font (Impact traditionally; we use a system bold).
Uppercase text.
White fill, thick black outline — readable against any background.
Pillow’s draw.text(...) supports outlines directly via two parameters: stroke_width and stroke_fill. The whole meme caption is one call:
def draw_meme_text(draw, text, position, font, fill="white", outline="black", stroke=4):
    draw.text(
        position,
        text.upper(),
        font=font,
        fill=fill,
        stroke_width=stroke,
        stroke_fill=outline,
        anchor="mm",   # center the text at the anchor point
    )
Two parameters earn the magic:
stroke_width=4— pixels of outline thickness. 3 is too thin; 6 is too cartoony. Around 4 hits the sweet spot for most image sizes.anchor="mm"— the text is middle-horizontal, middle-vertical-anchored at the position you give it. This makes centering trivial: pass the center point of where the text should be, not its top-left corner.
Understanding Auto-Fitting Text Width
A meme caption that overruns the image looks broken. We auto-shrink the font until the rendered text fits the image width:
def fit_font_to_width(text, max_width, target_size):
    """Find the largest font size <= target that fits in max_width."""
    size = target_size
    while size > 10:
        font = load_meme_font(size)
        bbox = ImageDraw.Draw(Image.new("RGB", (10, 10))).textbbox(
            (0, 0), text.upper(), font=font, stroke_width=4
        )
        text_width = bbox[2] - bbox[0]
        if text_width <= max_width:
            return font
        size -= 4
    return load_meme_font(10)
The pattern: start at the user’s requested size and shrink in steps until the text fits. The loop only kicks in for long captions — short text gets full size, no measurement overhead.
Note we include
stroke_width=4in the measurement. The outline adds to the text’s actual width, so we have to account for it — or the loop returns a size that fits the unstroked text but overflows once outlined.
Understanding the Meme Builder
The full meme function ties everything together. Top text goes near the top, bottom text near the bottom, both center-aligned:
def make_meme(image, top_text, bottom_text, target_size=60):
    img = image.convert("RGB").copy()
    draw = ImageDraw.Draw(img)

    # Margin from each edge
    margin = max(20, img.height // 20)

    if top_text:
        font = fit_font_to_width(top_text, img.width - 2 * margin, target_size)
        bbox = draw.textbbox((0, 0), top_text.upper(), font=font, stroke_width=4)
        text_h = bbox[3] - bbox[1]
        center = (img.width // 2, margin + text_h // 2)
        draw_meme_text(draw, top_text, center, font)

    if bottom_text:
        font = fit_font_to_width(bottom_text, img.width - 2 * margin, target_size)
        bbox = draw.textbbox((0, 0), bottom_text.upper(), font=font, stroke_width=4)
        text_h = bbox[3] - bbox[1]
        center = (img.width // 2, img.height - margin - text_h // 2)
        draw_meme_text(draw, bottom_text, center, font)

    return img
The pattern repeats for top and bottom — fit the font, measure the rendered height, compute the center point, draw. Pure function, no side effects: hand it an image and some text, get back the meme. Same as Day 2’s apply_watermark — and that consistency is the point.
Understanding Grid Math for Collages
The collage problem boils down to: given N images and a grid (R rows × C columns), how big should each cell be, and where does each image go?
The cleanest approach is to fix a target cell size and compute the canvas from there, rather than the other way around:
def make_collage(images, rows, cols, border, border_color, cell_size=400):
    cell_w = cell_h = cell_size
    canvas_w = cols * cell_w + (cols + 1) * border
    canvas_h = rows * cell_h + (rows + 1) * border

    canvas = Image.new("RGB", (canvas_w, canvas_h), border_color)

    for index, img in enumerate(images[:rows * cols]):
        row = index // cols
        col = index % cols
        x = border + col * (cell_w + border)
        y = border + row * (cell_h + border)
        canvas.paste(fit_into_cell(img, cell_w, cell_h), (x, y))

    return canvas
A few moves worth understanding:
(cols + 1) * border— there’s a border on each side and between every column. For 3 columns, that’s 4 border-widths total. Same logic vertically.row = index // cols,col = index % cols— integer division and modulo turn a flat list index into a 2D grid position. Image 0 → (0, 0); image 1 → (0, 1); image 3 in a 3-col grid → (1, 0). Classic pattern.canvas.paste(img, (x, y))— Pillow’s basic compositing: drawimgontocanvasat the given top-left corner.
Image.new("RGB", (w, h), color) creates the canvas filled with the border color, so empty space between the pasted images is automatically the right color. We never have to “draw the borders” — they’re just the parts of the canvas that don’t get pasted over.
Understanding the fit_into_cell Helper
Real photos come in different aspect ratios — landscape, portrait, square. Just resizing them all to the same dimensions distorts them. The right move is fit and center: shrink each photo to fit inside the cell preserving its aspect ratio, then center it on a square cell-sized canvas:
def fit_into_cell(img, cell_w, cell_h):
    """Resize `img` to fit in a cell_w x cell_h cell, centered, no distortion."""
    img = img.copy()
    img.thumbnail((cell_w, cell_h), Image.Resampling.LANCZOS)

    # Center it on a cell-sized canvas
    cell = Image.new("RGB", (cell_w, cell_h), (240, 240, 240))
    offset = ((cell_w - img.width) // 2, (cell_h - img.height) // 2)
    cell.paste(img, offset)
    return cell
thumbnail preserves aspect ratio; the centering math handles whatever’s left over with a light gray pad. The result: every cell is exactly cell_w × cell_h, no distortion, every photo placed sensibly. The collage layout math from above doesn’t need to care about individual photo sizes.
Understanding Saving Both Modes
Each mode runs through a Save button that triggers a save dialog and writes the current preview-equivalent image (full resolution, not the screen-shrunk version):
def save_meme(self):
    if not self.image:
        return
    final = make_meme(self.image, self.top_var.get(), self.bottom_var.get(),
                      self.size_var.get())
    path = filedialog.asksaveasfilename(defaultextension=".jpg", ...)
    if path:
        final.save(path, quality=92)
Note we rebuild the meme at full resolution before saving — the preview was a shrunken version. The user saw the layout; the save call produces the high-quality version of exactly that layout. Preview is a window onto truth, not its own truth.
Understanding the Full Picture
Three days of image work, one shape:
Day 1 took one image and applied filters interactively.
Day 2 took one folder and looped over it.
Day 3 takes one image (meme) or many images (collage) and produces a single new image.
The same Pillow primitives — Image.open, copy, convert, paste, ImageDraw.Draw, ImageFont, ImageEnhance — assembled in different shapes. There’s no special trick for “memes” or “collages” — only for combining the primitives sensibly. That’s the actual lesson of the week.
What You’ve Accomplished This Week
🎉 Congratulations! You’ve built a complete Pillow image toolkit:
Day 1: Live photo filters and adjustments in a Tkinter studio
Day 2: Batch-watermark whole folders with live preview
Day 3: Meme generator and collage maker in a tabbed app
You now have:
✅ Pillow fundamentals — Image, ImageDraw, ImageFont, ImageOps, ImageEnhance, ImageFilter ✅ The PIL ↔ Tkinter bridge — ImageTk.PhotoImage, with the GC reference rule baked in ✅ Real-world habits — EXIF orientation, RGBA compositing, JPEG quality ✅ Live-preview architecture — same function powers preview and save, so what users see is what they get ✅ Multiple working tools — filters, watermarker, meme generator, collage maker
Real-world applications:
🎨 Social media content — branded posts, memes, collages, watermarked photos
📷 Photography workflow — batch process exports, add copyright, generate previews
🛒 E-commerce — watermark product photos at scale
📚 Documentation and tutorials — annotate screenshots, generate diagrams
🤖 Automation — feed any of these into a script that runs on every uploaded image
Next steps:
Add a real font picker (browse local fonts)
Support emoji and unicode characters (Pillow can do it with a unicode font)
Add an undo stack (keep a list of past
editedimages)Build a CLI version so it’s scriptable
Try Pillow’s
ImageDraw.rounded_rectanglefor fancier collage borders
You’ve built the foundation for a real image-processing pipeline. 🚀
View Code Evolution
Compare today’s two-mode studio with Day 1’s filters and Day 2’s batch watermarker — and see how the same Pillow primitives assemble into completely different tools when you change the shape of the loop around them.
Keep reading with a 7-day free trial
Subscribe to Daily Python Projects to keep reading this post and get 7 days of free access to the full post archives.